X5: Processing Text
Anyone can dream up great ideas, but an idea is nothing until it's realized, be it as a website, a physical product, an app, or a user interface. — Jens Martin Skibsted
Fools ignore complexity. Pragmatists suffer it. Some can avoid it. Geniuses remove it. — Alan Perlis
Chapter X4 introduced the JavaScript programming language for augmenting Web pages to make them dynamic. By assigning JavaScript statements to event handler events, HTML elements can be made to react to events and change the content of the page. For example, statements could be added to the onmouseover and onmouseout attributes of an img element to change its source and/or size in response to mouse movements. Likewise, JavaScript statements added to the onclick attribute of a button could cause text to appear within the page when that button is clicked.
This chapter builds upon this idea of dynamic Web pages, adding features that allow the user to enter information directly into text boxes and incorporate their input into the page. This enables the user to fully interact with the page, providing input that controls the behavior of the page itself. To help manage the complexity of dynamic, interactive pages, simple user-defined functions are introduced that allow the developer to simplify the structure of HTML documents. Variables are also introduced to further reduce complexity.
User Input via Text Boxes
Mouseovers and clicks are simple ways in which the user can control actions in the page. If we want a page that can react in more complex ways, however, we need additional mechanisms for providing richer input. For example, to design a personalized page that integrates the user's name in its content, there must be a way for the user to first enter their name. A text box is an HTML element that enables the user to input text, which can then be accessed and used within the page. When displayed, a text box appears as a rectangle in which the user can type. For example:
A text box is created in HTML using an input element, with an attribute that specifies what type of input element it is: type="text". Since the intent is for the text box contents to be used within the page, it must also have an id attribute. Thus, the general form of a text box element is:
<input type="text" id="ELEMENT_ID">
By default, a text box will be empty and wide enough to display 20 characters. If you want it to be shorter or longer, you can assign its size attribute. Likewise, a text box will appear empty by default. If you want it to display a value when the page loads, you can assign its value attribute. For example, the following text box would be 12 characters wide and would initially contain the word "Dave".
<input type="text" id="nameBox" size=12 value="Dave">
After a text box has been displayed in a page, the user can change its contents by typing text within the box. A JavaScript statement can access the contents of the box through the value attribute: ELEMENT_ID.value
Since a lone text box on a page provides no context as to its purpose, it is important to provide a label for each text box so that the user knows what they are supposed to enter. The label element provides text that will appear next to the text box. For example,
<label for="nameBox">Enter your name</label> <input type="text" id="nameBox" size=12 value="Dave">
The opening label tag has a for attribute that specifies the ID of the element that this label is connected to. Within the opening and closing label tags is the text of the label. Every text box that appears in a page should have an accompanying label element.
For example, the HTML document in EXAMPLE 5.1 contains the above label and text box. When displayed in a browser, the label text Enter your name appears to the left of the text box, which contains the default value Dave. When the user clicks on the "Click for Greeting" button, the JavaScript statement assigned to the onclick event handler is executed to (1) access the box contents using the expression nameBox.value, (2) glue the box contents to the end of the string literal 'Hi ', and (3) and display the resulting message in a paragraph.
EXERCISE 5.1: Confirm that the Web page from EXAMPLE 5.1 behaves as described by clicking the "See in Browser" button and clicking on the button. Enter your own name in the text box and confirm that the message changes based on your entry.
EXERCISE 5.2: Modify the message that appears in the Web page from EXAMPLE 5.1 so that a period appears after the name. To accomplish this, you will need to add another piece to the message, the string literal '.', and glue that piece to the end using a + sign.
 Common Errors to Avoid
Consider a courtroom scene in which the bailiff instructs a witness to "Repeat after me: I, state your name, promise to tell the truth, the whole truth, and nothing but the truth." The intent is for the witness to not repeat this phrase exactly, but instead to substitute their name in place of "state your name." The equivalent intention is involved when you integrate an expression of the form ELEMENT_ID.value into a message.
It is essential that the expression ELEMENT_ID.value NOT be enclosed in quotes when appearing as a piece of a message. For example, in the statement:
greetP.innerHTML = 'Hi ' + nameBox.value;
the expression nameBox.value does not appear inside quotes. This signifies that it is not plain text but instead represents a value that must be accessed and inserted into the message. If the expression were enclosed in quotes, it would be treated as a string literal and the message 'Hi nameBox.value' would be displayed (similar to the witness blindly repeating "I, state your name, ..." in the oath).
Multiple Inputs → Multiple Boxes
If the user needs to be able to enter more than one value, multiple text boxes (with labels) can be embedded in a page. For example, the HTML document in EXAMPLE 5.2 adds a second text box to the greetings page to enable the user to enter their first and last names. The message that is displayed when the button is clicked is more complex, incorporating the contents of both boxes. Since the message is too long to fit on a single line, it is broken across lines. Remember: you can break a long message across lines with the pieces glued together using + signs, but each piece of the message must begin and end on the same line.
EXERCISE 5.3: Confirm that the Web page from EXAMPLE 5.2 behaves as described by clicking the "See in Browser" button and clicking on the button. Enter your own first and last names in the text boxes and confirm that the message changes based on your entries.
Common Errors to Avoid
There are two types of errors that you will likely make when constructing complex messages. Learning to recognize and understand each error type can save you considerable amounts of time and frustration.
- MISSING QUOTE: If you have an opening quote but forget the corresponding closing quote, this will cause an error. For example,
messageP.innerHTML='Hello + nameBox.value + '!';Since the closing quote after
Hellois missing, the browser will interpret the string literal as extending all the way to the exclamation point (as highlighted in red). At that point, it will be confused by the exclamation point since it is not part of a string literal. The error message that would appear in the JavaScript Console would beUnexpected token '!'. - MISSING + SIGN: A + sign must appear between each piece of the message in order to glue the pieces together. If you omit a + sign, an error will occur when the browser encounters the next piece. For example:
messageP.innerHTML='Hello ' nameBox.value + '!';
In this example, the error message that appears in the JavaScript Console would be
Unexpected identifier: nameBox(or something similar), since it expected either a + sign (to extend the message) or a semi-colon (to end it), not thenameBoxidentifier.
EXERCISE 5.4: Remove the closing quote from one of the message pieces in EXAMPLE 5.2. Confirm that an error occurs and view the resulting error message in the JavaScript Console. Restore the quote and remove one of the + signs. Confirm that an error occurs and view the resulting error message in the JavaScript Console.
 Designer Secrets
It is strongly recommended that, when constructing a complex message, you add one piece at a time and test the page after each addition. That way, if you make an error, you'll know it occurs in the last piece added.
For example, when creating the page in EXAMPLE 5.2, you might start by just displaying 'Hi' followed by the firstname. If an error occurs when viewing the page (e.g., you misspelled the ID for the box), it will be easy to identify. When that portion of the message displays correctly, add the last name to the message and test the page again. If an error occurs, you know it must involve the new piece you added to the message. Finally, add the remainder of the message to complete the page.
Aligning Text Boxes
You may have noticed that the text boxes and their labels in EXAMPLE 5.2 do not align. That is, they appear as:
Enter your first name:
and last name:
Since the text boxes follow labels that are of differing lengths, they do not line up in the page. When displaying multiple text boxes, it is often more attractive to align them:
Enter your first name: and last name:
Fortunately, there is a simple HTML element that produces the desired alignment: a table (Chapter X1). We can define a table with two columns, where the first column contains the labels, and the second column contains the text boxes. The browser will adjust the column widths to accommodate the longest entry, so the boxes will align, as shown above.
The HTML document in EXAMPLE 5.3 utilizes a table to align the first and last name boxes.
EXERCISE 5.5: Confirm that the text boxes from EXAMPLE 5.3 align by clicking the "See in Browser" button and clicking on the button. Modify the label for the first text box to be longer, such as Please enter your first name. Confirm that the first column expands and the boxes still align.
Consider a more interesting example of an interactive, input-driven page. Suppose you are an event planner and find yourself constantly designing and emailing invitations. You realize that the invitations generally take the same form. For example:
Dear Buddy,
Have you heard about my birthday, which is coming up on Friday? It would mean a lot to me if you could make it to my birthday.
Your friend,
Dave
and
Dear Sue,
Have you heard about Cinco de Mayo, which is coming up on May 5th? It would mean a lot to me if you could make it to Cinco de Mayo.
Your friend,
Dave
The HTML document in EXAMPLE 5.4 implements this scheme. When the button is clicked, the contents of the three text boxes are accessed and integrated into a message that is displayed in the page. Note that the message contains HTML tags, which are interpreted by the browser when displaying the message. In particular, the message is divided into three paragraphs, with the last paragraph containing a line break. The date for the event appears in bold, since dateBox.value is surrounded by <b> and </b> tags. Similarly, the phrase "a lot" is italicized. Also note that a page division (div) is used to display the message as opposed to a paragraph, as was the case with previous examples. Since the message contains multiple paragraphs, and you can't have a paragraph inside of a paragraph, the larger div element is needed to hold the message.
EXERCISE 5.6: Confirm that the Web page from EXAMPLE 5.4 behaves as described by clicking the "See in Browser" button and clicking on the button. Change the contents of the boxes and click to confirm that the invitation changes appropriately.
Add a sentence to the end of the invitation of the form: "I hope you can make it on X." where X is the date specified in dateBox. Confirm that this sentence displays correctly.
EXERCISE 5.7: Modify the HTML document from EXAMPLE 5.4 so that there is an additional text box where the user can enter the time for the activity. Then, modify the message so that the activity's time is incorporated into the invitation.
Simplifying Pages with Functions
Recall that an HTML document is divided into two sections, the head and the body. The head section is intended to contain information about the setup of the page (such as identifying the author and setting the title that appears in the browser tab). The body section is intended to contain the visible contents of the page. Ideally, a developer should be able to look at the body section of an HTML document and immediately visualize the contents of the page. However, when looking at the body in EXAMPLE 5.4, it is not immediately obvious how the page will appear. The problem is that the JavaScript statement in the onclick attribute is long and complex. It overwhelms the HTML elements in the body, making it difficult to identify those elements and their arrangement. Fortunately, JavaScript provides a feature that simplifies the body of complex pages, making them easier to understand and implement: functions.
Mathematically speaking, a function is a mapping from some number of inputs to a single output. For example, the absolute value function maps an input number, say -5, to its positive counterpart, 5. In math notation, we would write: |-5| = 5
From a software developer's perspective, it is more useful to think of a function as a unit of computational abstraction. What this means is that a function carries out some series of computations (e.g., calculating the absolute value of a number) without having to show the steps involved. In this example, the steps involved in calculating the absolute value are abstracted away and replaced by the | | notation.
User-Defined Functions
JavaScript allows you to define your own functions in an HTML document. This allows you to take complex statements, such as the one assigned to the onclick event handler in EXAMPLE 5.4, and define a function that carries out those steps. Then, the statement(s) in the onclick can be replaced by a simple call to the function, which executes the statement(s). The result is a body that is much simpler and easy to visualize.
The simplest form for a user-defined function, which suffices for now, is given below:
    function FUNCTION_NAME() {
        STATEMENT(S)_TO_BE_EXECUTED
    }
The first line begins with the word function, followed by the name of the function, a pair of parentheses, and a left curly brace. By convention, the name chosen for a function should start with a capital letter and consist of letters and/or digits. As was the case for ids, a function name should be descriptive of the task that it is meant to perform. The statement or statements to be executed when the function is called follow on subsequent lines. Although not required by the browser, you should always indent the code inside the curly braces to improve readability, making it easier to spot where the function definition begins and ends. The function definition ends with the closing right curly brace.
JavaScript function definitions are placed in the head section of the page, enclosed in a script element (using tags <script> </script>). The script tags inform the browser that their contents are JavaScript statements as opposed to HTML. Since the head of a Web page is processed before the body, placing the function definition in the head ensures that the function will be defined and callable by any JavaScript statements in the body of the page. To call a function, i.e., execute the statement(s) defined by that function, you simply specify the name of the function followed by parentheses: FUNCTION_NAME();
The HTML document in EXAMPLE 5.5 reimplements the invitation page (EXAMPLE 5.4) to incorporate a user-defined function. In the head of the page, enclosed in script tags, is the definition of a function named Generate. Note that the statement inside the function curly braces is identical to the statement that appeared in the onclick attribute in EXAMPLE 5.4. Once this function is defined in the head of the page, it can be called from the onclick attribute of the button to execute that statement. The behavior is the same as before, but the body is much simpler since the complexity of the JavaScript statement is moved to the head and only a function call appears in body.
EXERCISE 5.8: Confirm that the Web page from EXAMPLE 5.5 behaves the same as before. Change the contents of the boxes and click to confirm that the form letter changes appropriately.
EXERCISE 5.9: Modify the name of the function in EXAMPLE 5.5 so that it does not match the function call. For example, you might misspell the function name as Genarate. Confirm that the function fails to execute as a result of this error. What error message appears in the JavaScript Console?
EXERCISE 5.10: Modify the greetings page in EXAMPLE 5.4 so that it similarly uses a function. The statement assigned to the onclick attribute should be placed in a function definition in the head of the page (enclosed in script tags) and that function should be called in the onclick.
Designer Secrets
When designing a page with a button, the choice of whether to define a separate function should be determined based on complexity. If the statement or statements in the event handler spans multiple lines, it is probably worthwhile to move those lines into the head as part of a user-defined function. This greatly simplifies the body of the page and makes it easier to visualize the layout of the different HTML elements. If the user wants to view the source of the document, the behavior of the button is clearly separated out into the function.
Multiple Actions → Multiple Functions
As we saw in Chapter X4, an event handler can initiate multiple actions by executing multiple JavaScript statements. For example, the HTML document in EXAMPLE 4.4 changed both the source and height of an image when the mouse moved over and out. The HTML document in EXAMPLE 5.6 reimplements this page to incorporate user-defined functions. Since there are two different events that must be processed, there are two functions defined in the head section (in script tags). The first function, named DoOver, contains the two statements that are executed when the mouse moves over the image. Similarly, the second function, named DoOut, contains the statements that are executed when the mouse moves out.
EXERCISE 5.11: Confirm that the Web page from EXAMPLE 5.6 behaves the same as before. What would happen if you forgot the parentheses in the call to DoOut in the onmouseout event handler? That is, onmouseout="DoOut;". Make this modification and confirm that this error results in the failure of the function.
Simplifying Functions with Variables
As EXAMPLE 5.5 shows, a user-defined function can simplify an HTML document by separating actions (JavaScript statements) from appearance (HTML elements). Actions, defined by JavaScript statements, appear in a function definition in the head of the page. The body contains the HTML elements that specify the content of the page, with only the function call connecting the button to the action. In addition to functions, another JavaScript feature can be used to simplify documents and create a general template for the more complex Web pages we will develop moving forward.
A variable is a name used to symbolize a dynamic value, i.e., one that might change over time. Variables are used extensively in mathematics to denote arbitrary or unknown values, such as in the Pythagorean Theorem:
a2 + b2 = c2where
a, b and c represent the sides of a right triangle; or, in words problems such as the following:
Suppose y = 3x + 1. Solve for x when y is 7.
A variable assignment is a JavaScript statement that assigns a value to a variable, in much the same way that attributes are assigned values in HTML. For example, the following assignments store the contents of the text boxes from EXAMPLE 5.5 in variables:
    recipient = recipientBox.value;

    event = eventBox.value;

    date = dateBox.value;
Note that the variable names in these assignments are variations of their corresponding text box ids. This is not required — we could have just called them x, y and z. However, it is good practice to choose variable names that denote their purpose. In this case, it is natural to refer to the contents of recipientBox as recipient, the contents of eventBox as event, and the contents of dateBox as date.
The HTML document in EXAMPLE 5.7 reimplements the invitation generator page (EXAMPLE 5.5) using these variable assignments. The contents of the text boxes are accessed and assigned to variables at the beginning of the function. Those variables are then used in building the message, which simplifies and shortens the message considerably.
EXERCISE 5.12: Confirm that the Web page from EXAMPLE 5.7 behaves the same as before. Change the contents of the boxes and click to confirm that the form letter changes appropriately.
EXERCISE 5.13: Similar to the modification you made in EXERCISE 5.7, add a text box to the invitation page in EXAMPLE 5.7 that contains the time of the event. Add a fourth variable that is assigned the contents of this new box and incorporate that variable in the invitation message.
EXERCISE 5.14: Modify the greetings page in EXAMPLE 5.3 so that it similarly uses a function and variables to simplify the page.
Common Errors to Avoid
Technically, a variable name can be any sequence of letters, digits, and underscores, as long as the sequence starts with a letter (by convention, this book will always start variable names with a lowercase letter and avoid underscores). Neither spaces nor special characters can be used in variable names, and some words are reserved by JavaScript and the browser (see below). JavaScript variables are case sensitive, meaning that capitalization matters. Consequently, names such as username, userName, and userNAME all represent different variables.
Reserved words that should be used as variable names.
| abstract | arguments | await | boolean | break | byte | case | catch |
| char | class | const | continue | debugger | default | delete | do |
| double | else | enum | eval | export | extends | false | final |
| finally | float | for | function | goto | if | implements | import |
| in | instanceof | int | interface | let | long | native | new |
| null | package | private | protected | public | return | short | static |
| super | switch | synchronized | this | throw | throws | transient | true |
| try | typeof | var | void | volatile | white | with | yield |
Putting It All Together
Chapter X4 ended with a Web page that served as a photo gallery. A single image was displayed on the page, but the user could change the image (and a corresponding caption) by clicking on buttons. Consider a variation on this gallery page, in which there is a text box (with label) in which the user can enter the name of a country (FIGURE 1).
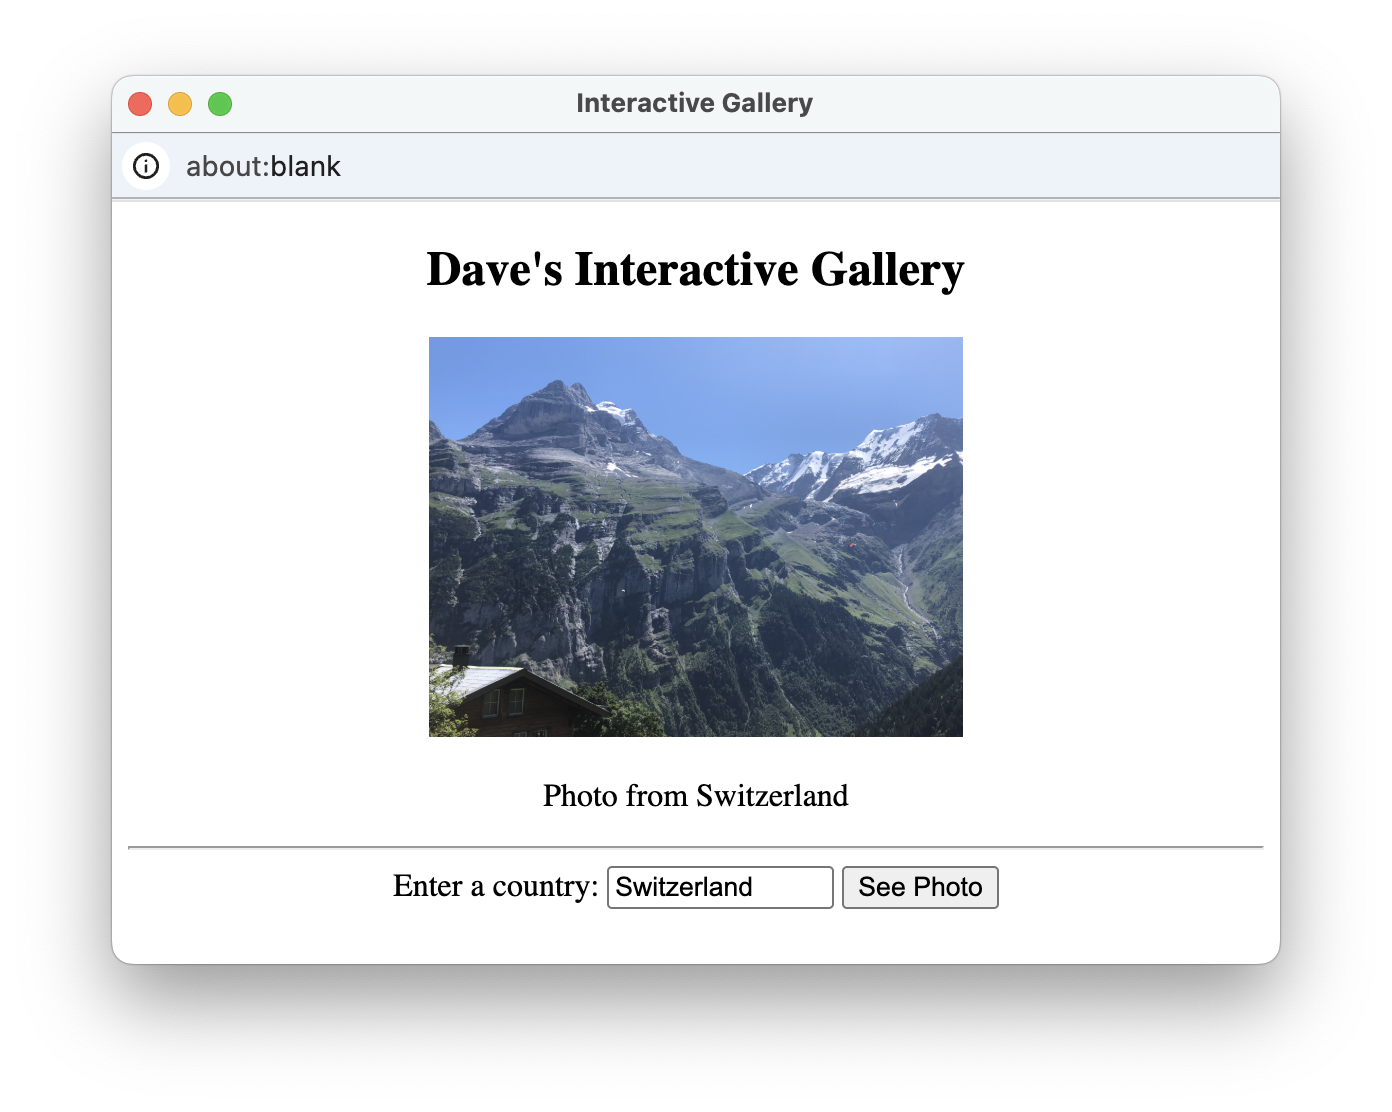
FIGURE 1. Photo Gallery Page.
This page assumes that all the image files are stored together with names corresponding to their country (e.g., Switzerland.jpg, Ireland.jpg, etc.). If the user wants to see the photo from Ireland, they enter "Ireland" in the text box and click the button. The image changes its source to Ireland.jpg and the caption changes to match. As before, the image doubles in size when the mouse moves over it and returns to its original size when the mouse moves out.
There are several details to note about this document and how it implements the desired appearance and behavior of the page.
- There are three actions that can occur within the page: (1) when the mouse moves over the image, it expands in size, (2) when the mouse moves out, the image returns to its original size, and (3) when the button is clicked, the image and caption change. Functions corresponding to these three actions are defined in the head of the page (in
scripttags). - The
ExpandandRestorefunctions each contain a single JavaScript statement that changes the size of the image. These functions are called by theonmouseoverandonmouseoutevent handlers, respectively. - The text box, where the user is to enter the country name, has the attribute
id="countryBox". It is 15 characters wide, to accommodate long country names, and initially contains "Switzerland" (matching the initial photo). - There is no
<br>tag between the label and the text box, nor between the text box and the button. As a result, these three elements will all be displayed on the same line. - The
ShowPhotofunction, which is called in the button'sonclickevent handler, contains the three JavaScript statements. The first accesses the contents of the text box and assigns it to the variablecountry. The second statement changes the image source and the third changes the caption, both based on thecountry. - The image files are assumed to be stored online in the
https://freecsc.com/Images/folder. The full address for the image file is constructed by gluing together the folder address + the country name + the.jpgfile extension. For example,'https://freecsc.com/Images/'+country+ '.jpg' → 'https://freecsc.com/Images/'+'Ireland'+'.jpg' → 'https://freecsc.com/Images/Ireland.jpg' - If the user enters a country name for which there is no corresponding image file (e.g., "Portugal,") then a broken image link will appear in the page along with the text assigned to the
altvalue for the image:Vacation Photo.
Chapter Summary
- A text box is an HTML element that accepts user input in a Web page. The general form of a text box is as follows:
<input type="text" id="ELEMENT_ID" size=NUM_CHARS value="INITIAL_TEXT">
- The size and value attributes of a text box are optional: if the size attribute is omitted, the box will have a default size of 20 characters; if the value attribute is omitted, the box will initially be empty.
- Each text box should be accompanied by a
labelelement which specifies text that provides context for the box:<label for="ELEMENT_ID">LABEL TEXT</label>
- A JavaScript statement can access the contents of a text box using an expression of the form:
ELEMENT_ID.value - When displayed as part of a message, the expression representing the contents of a text box should not be enclosed in quotes, e.g.,
greetP.innerHTML='Hi ' + nameBox.value;. - A user-defined function can simplify the body of a Web page by encapsulating all the JavaScript statements associated with an event handler (e.g., onclick) in the head of the page.
- The general form of a user-defined function is as follows:
function FUNCTION_NAME() { STATEMENT(S)_TO_PERFORM_THE_DESIRED_BEHAVIOR } - To call a function, i.e., execute the statement(s) contained in the function definition, specify the name of the function followed by parentheses:
FUNCTION_NAME(); - User-defined functions are placed in the head of the page, between the tags
<script>and</script>. Multiple functions can be defined within the same pair of script tags. - More than one function can be defined in the same
scriptelement. - A variable is a name used to symbolize a dynamic value, i.e., one that might change over time.
- A variable assignment is a JavaScript statement that assigns a value to a variable.
Projects
All projects should follow the basic design guidelines described in this and the previous chapters. These include:
- Any complex action that takes place in the page should have a corresponding function defined in the
head(inscripttags). The statement(s) in the function should be indented, and the name of the function should be descriptive of its purpose. - If a function accesses the contents of a text box, it should do so once and assign the value to a variable. Variables and text boxes should have descriptive names.
- Each text box should have a label to its left, describing its purpose. If there are multiple text boxes, they should align.
PROJECT 5.A: Download a copy of the HTML document in EXAMPLE 5.9 (by clicking on the Download link) and save it on your computer under the name photos.html. Using a text editor of your choice, make the following modifications/additions to your document:
- After the name "Dave Reed" in the
metatag, add "(modified by X)", where X is your name. - Change the top-level heading so that it includes your name.
- Store four image files of your choice in the same folder as your Web page. These should be scenic photos that are named by their country (e.g., 'Ireland.jpg'). Modify the page to display these local images along with descriptive captions.
PROJECT 5.B: A popular children's party activity is a fill-in-the-blank story, where a potentially humorous story is written down with blanks inserted in place of some of the key words. Before reading the story, the storyteller asks the others present for words to fill in the blanks. Those selecting the words are told only the type of word required and have no other knowledge of the story. This lack of context in selecting words can result in an entertaining story when the words are substituted into the corresponding blanks. For example, suppose the storyteller has the following story in mind:
It was a adjective kind of day when boy's name walked out into the street. The sky was a deep color, and boy's name was walking his pet animal...The storyteller would prompt the others for words to go into the blanks, e.g., adjective = quiet; boy's name = Chris; color = mauve; animal = gnu. The story can then be read with the words filling in the corresponding blanks:
It was a quiet kind of day when Chris walked out into the street. The sky was a deep mauve, and Chris was walking his pet gnu...
Create a Web page named story.html that serves as an interactive fill-in-the-blank story page. Your page should contain text boxes where the user can enter words to fill in the blanks in a story. It should also contain a button which, when clicked, causes the story to be displayed with the user's words entered in the appropriate places (see below).
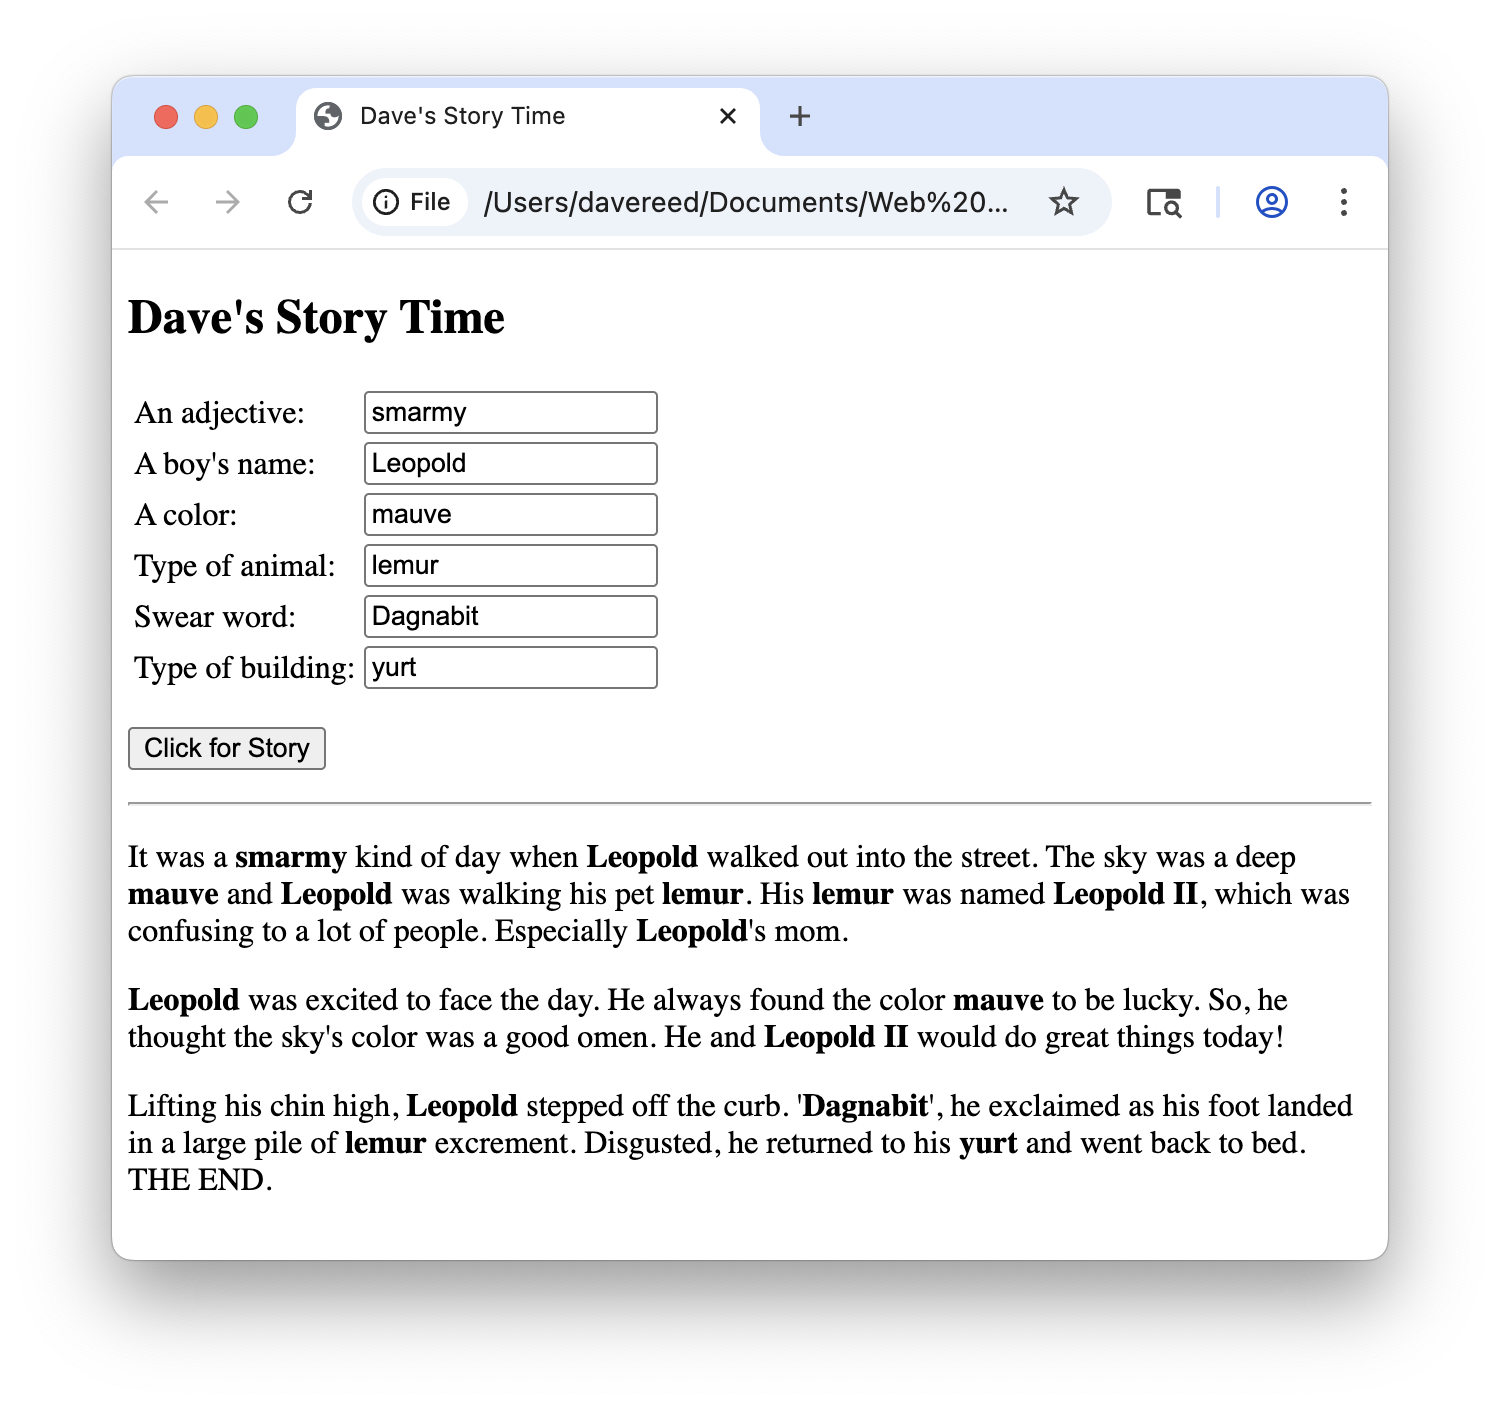
The content of the story can be anything that you like — be creative! However, your story must meet the following conditions:
- It must be at least three paragraphs long, with each paragraph containing at least four sentences.
- It must have at least six missing words or phrases (with corresponding text boxes).
- At least one of the missing words/phrases must be used multiple times in the story. For example, the boy's name was used twice in the sample story above.
- The words/phrases that were entered in the boxes should appear in bold when inserted into the story.
- The page should have a title at the top, which includes your name.
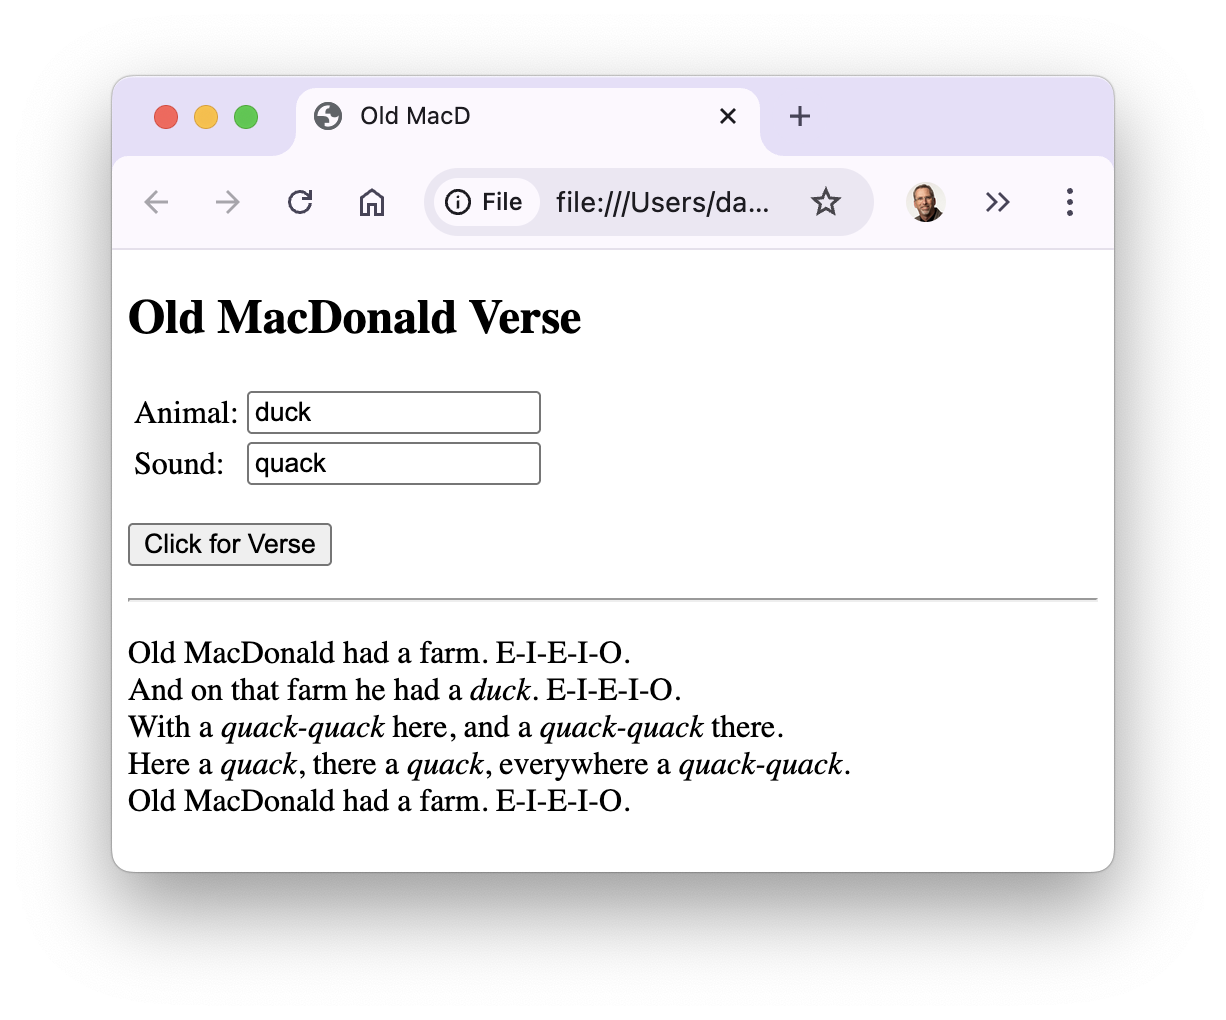
PROJECT 5.C: In the children's song Old MacDonald had a Farm, each verse has the same simple form, differing only in an animal's name and sound:
Old MacDonald had a farm. E-I-E-I-O.
And on that farm he had a animal. E-I-E-I-O.
With a sound-sound here, and a sound-sound there.
Here a sound, there a sound, everywhere a sound-sound.
Old MacDonald had a farm. E-I-E-I-O.
Create a Web page named oldmac.html that displays a verse of the song. Your page should have two text boxes (with labels) in which the user can enter the animal's name and corresponding sound. When the button is clicked, a verse using that animal name and sound should be displayed. Each sentence in the verse should be on a separate line, and the animal's name and sound should appear in italics. For example: